My Recent Cards

topmom5's slideshow for blog album on Photobucket

Nov 22, 2015

Here's a story of a labor of love and teamwork! 

With Christmas coming, we were having a crisis trying to figure out how to handle my ever expanding craft area and still put up the tree.  The inadequacy of my crafting area, sprawl, and unavoidable disarray when working became a discussion.  I've long dreamed of a 'real crafting table' instead of the 2 card tables and stacks of tubs and boxes and totes and containers underneath I work with now.  I mentioned to him that I knew that folks were building their own, having seen them on the internet before, so we decided to research Dr Google and found lots of ideas for a DIY Craft table.  

After discussing what i wanted/needed, Hubby decided he could build a customized version of the 'door on the bookcases' craft center.  The customization would be primarily because my craft table is going to be against a wall, and framed on one side by tall bookcases and a door on the other.  

We started with shopping the bookcases, settling on the stock 2X3 bookcases, and found a deal on the darker color - so got 3 of them - one for each side and one for the back.  They delivered, and although there were a couple of dents in the edges and corners, were easy enough to put together.  He disliked the lack of full backing boards, so went out and got a cheap piece of luane panel and stained to come really close to the color of the bookcase.   

Here's one of the side cases, and how he's got it backed. 


Here's a shot from the front showing the 2 side and 1 back bookcase (sorry for the color).    


Now that he could see what he was working with for a base, he went on the mission to find what he could work with to make the tabletop, and in fact had started working on it before I knew.  Dear hubby found white melanin covered plywood at the local big-box Men's Adult Toy Store - and used that as the base for the tabletop, instead of the solid core door that most of the DIY craft table instructions we found favored.   I got home late from work exhausted and frustrated, and there in the middle of the living room floor was the beginning of my white tabletop - which drew the first smile I'd had all day!  The tabletop was upside down, with the framing facing up and bookcases placed, and he was marking off where the bookcases sat for adding guides.  

Little did he know that after the bookcases had come in and been built up, I decided to not burden him with trying to build shelving for the top, and went on a shopping spree for shelves. I bought all 5 shelves in white figuring that even if i had a wood-grained tabletop the white shelves wouldn't be too bad as long as they all matched.  The shelves showed up a cupla days later and the boxes were pushed to the side until needed.  So now my purchase of the white shelves was especially perfect!! 

As he built up the top piece, with a small lift for tabletop heights, internal support and guides for placement, I expressed concern for the flexibility of that much unsupported tabletop/plywood, where there was the 36" across the front between bookshelves.  He'd built a top that was 6 running feet long by 37 inches deep - to which he now added a drop lip around the whole thing to stabilize, using some of the left over wood cut off the original sheet.  Now he wanted to finish the edge somehow, breaking up the white and bringing up the color of the bookcases.  He decided to router out around the edge and finish with end cap trim. So yesterday we hauled the top outside and he router-ed around the top edge, sanded around the bottom of the lip, and did some cutting on the trim to match up the edges.  He put a quick layer of stain on the trim, and i helped him bring it all back inside, managing to beat the rain by about 5 minutes.  


For the first time the top was on top of the shelves, instead of the other way around!  He'd been building the whole thing upside down up to this point.  And it looked great - if lacking the edge trim at this point!!! I laid down for a nap, and when I awoke, the shelves were all assembled and placed on top of the table! The edge trim was attached last night after the staining dried.  


We rearranged the shelves this morning, and started discussing options to back the shelves so nothing pushes through and falls through behind the bookcases! We decided to re-purpose the unused backer boards from the bookcases for the two 3X1 shelf units.  Hubby's going to spray paint the boards white, trim them slightly, and use them for the 3X1 shelf units.  They're currently being pressed flat under the unit with the 9 compartments.  And for the longer shelves, he's got some luane left from the piece bought to back the bookshelves, as soon as he determines if it will take the white paint. 

My mission now is to tear down my existing craft area so we can pull out the tables and tubs and totes and boxes and containers, so we can move my new craft table in to it's permanent home.  It's amazing how much consolidation I've been able to do already - and how I'm already back at one of the Big Box Crafter's Toy Stores looking for stuff for desktop organization!  

I showed hubby pictures this morning of those cute little ATG Stands that can be found in a few places online, and he's going to build one for me!  He agreed with me - there's no need to spend nearly $40 on something he can build with scrap lumber for a cupla hours worth of time.  We're also looking at options for my desk lamp, and how/where to mount it.  He wants the table in it's final resting place and somewhat setup before he makes a final decision. 

We're hoping to get the table moved into place no later than the end of Thanksgiving weekend... which will be just in time to start putting up the tree - since the tree has to go where it's at right now!! That way too, i can get a chance to play at my table and see if it needs lifted more - that's the only concern right now...and he's got a plan to lift if needed.  

I'll take more pictures once it's in place - even if it's not completely set up...

All told the spend has been about $160 (estimated high) - which is easily 1/4 of what it would have cost to buy a stock craft table - not counting extras.  The fact that this is customized the way I want it - and has been a collaborative effort between the two of us - my ideas his labor - makes it that much more precious to me.  

And I want to make it perfectly clear - I love my hubby!!!  
And I know He loves me!  And that's why this is a story of love. 
His tolerance of my mess, created while I'm in my 'crafting' world, headsets in my ears, audio-book playing and no real sense of what's going on around me,  has been noteworthy.  His eagerness to take on this project, solely for making me happier is why I always call him a Near-Saint.  

Yes - he's hoping it will lead to less sprawl and mess in an area just off the living room - but really - he's doing this to make one of my dreams come true.  
We've been together almost 30 years - 25 married - and I love him more today than I did the day we got married.  And whenever we take on a project - like building a crafting table - we work well together, our ideas compliment each others, we listen, we share, and each brings their A-Game to making the project a success, and share in the celebration at the end.  

I love my hubby! 
And I think the first thing I'm going to do when my new table is set up is make a card for him telling him just how much I appreciate my table - and love him! 


Aug 22, 2015

I'm shipping my 'due by the 20th of the month' cards today - 
gotta hate it when work interferes with  your life!! 

This month's CardsForACause (CFC) were a bit of a challenge for me, in that I found I'm not so comfortable with Sympathy cards - and that was what was requested.  and Thank You - which i'm fine with!  Ronald McDonald House (RMD) was fine - and again this month I 'shared' my creations between the 2 groups.  Although no sympathy cards went to RMD there were no birthday cards to CFC!!  

As usual, the cards are mostly done on StampinUp CardStock bases, with the silver sympathy card the one exception - it's on DCWV shimmer cardstock.  I used a variety of papers for stamping on - from StampinUp, Recollections and Crafters Companion.  And several of the stamps used are obviously StampinUp, but i couldn't tell you where the rest came from.  Almost all background papers used were StampinUp, and the cardstock for layers was shimmer cardstock from either DCWV or Crafters Companion.   Everything was stamped with Tsukineko Memento or Brilliance (metallic) ink.  There are a few cards that were stamped with Multi-Part stamps form KitchenSinkStamps, which would have been impossible without my MISTI stampin tool, from My Sweet Petunia!!   Lotsa diecut butterflies on holographic origami paper glued down to cheap white cardstock and then diecut.  The various white and mottled vellums were from an old cache of supplies from years ago, so i have no idea where they're from.  Mulberry Flowers are from a vendor in China and painstakingly stacked together here.  Markers used for hand coloring from LetraSet.  


KitchenSinkStamps multipart lily on white and silver. Learning how to do Sympathy cards. 
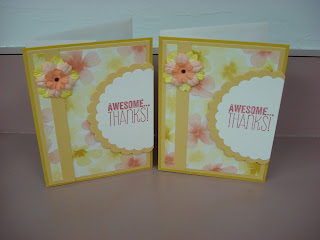
Simple and clean - using new Crafters Companion cardstock  Awesome...Thanks!!! 
2 More Sympathy Cards, each with Spellbinders Crosses on the front. 
More KitchenSinkStamps - poppy this time!  Very Bright! 
Actually using leftover diecuts -  simple ThankYou Cards
I do like the Stained Glass effect!  and shimmer Cardstock accents! 
This came out much better than expected - it was something I thought i'd try - and it worked well.  
Another Sympathy card - stained glass effect - and the die cut rose.  I actually enjoyed making these ones. 
Bright and Shiney!  Great for a ThankYou!!! 
Happy Birthday!  with holographic accents!  Very Pretty! 

Jul 20, 2015


And as a new era of card making begins (POST OWH), I find myself split between 2 organizations, both who are receiving cards this month.  SplitCoastStampers is kinda a mecca of swaps and challenges and learning in the papercrafts world, and logically hosts several swaps and challenges.  That's where I originally found OperationWriteHome, so I went back to them to find alternatives. I may yet find a home with a military-centric organization, but for now i've decided to play along with 2 groups


Ronald McDonald House strikes because my daughter spent a few days at the one in Tampa almost 11 years ago following the birth of her daughter - my granddaughter!  Turns out my granddaughter spent the first 8 days of her life in the ICU - 6 of them on a ventilator - 5 before the hospital let Mom & Dad name her.  Born on Saturday, she fought and fought, and late Tuesday night/Wednesday morning she finally made a turn around, and on Wednesday she was named Clarissa Dawn.  I am pleased to say that she is FINE!! well - for the most part!  Precocious, stubborn, bright, energetic, loves to read and is generally a joy to be around.  And they kept mom close after she was discharged from a rather difficult childbirth by putting her up in the Ronald McDonald House attached to the hospital.  And it was a VERY good thing!

Cards For A Cause  - well - that kinda says it all!  I've been making cards for a cause for a while - so it seemed logical to continue to do so.  They change up every month with different causes, and some of the past ones are open all the time - for 'spares' if you will... Right now I'm on-board with them too.

I took pictures of the cards being packaged for July's Cards for a Cause, but as it turns out, both charities got almost all the same cards, as i work best in multiples, with variations on a theme.  They're all with envelopes, and 'tucked' in the finest OWH style.   Unlike anything I've done before, I've 'banked' some cards this time, just in case i hit a 'dry spell' where i can't make cards for work commitments but still want to send some off. Most cards were made in sets of 6 - 2-3 for Cards for a Cause, 1-2 for Ronald McDonald House and 1-2 for the bank. 

DieCut Fans in Silver and Gold Shimmer from Michaels, ombre ribbon on a lovely Victorian floral print background paper matted on shimmy white and pink cardstock. 
Stary Sky background on a nice shiny finished paper, silver border on the Reach for the Moon sentiment, with a couple of diecut stars on each. 
One of the specific requests for this month's cause was to make cards appropriate for kids - teens specifically.  The funky color scheme, foiled paper, and fun sentiment seemed apporopriate. 
Thank You cards in various combinations - the butterfly on the left card is DieCut and backed with white vellum - the ballons are gold to go with the gold stamped sentiment.  
Inspirational cards - something also requested for July's Cards for a Cause - and this seemed appropriate.  The bows and mat on the inchies are shimmer cardstock.
Foil paper accents kinda pop on the neutral almost dark background, and pick up the colors in the mat on the sentiment. 
Another inspiration - or permission i suppose - to have fun!  maroons and various prints and bows.  There were actually 3 of these in the shipment.  
This may be a Northwoods stamp, with just the lighthouse and sunrise colored in - and the image elevated from the framing. 
Again with the funky foiled paper - probably great for teens! Happy Birthday is a generic sentiment and the mulberry flowers help do justice to the overall fun on the card. 
July Cards for A Cause

Jul 10, 2015


My time and dedication to Operation Write Home is coming to an end.  I've just finished packing the last box I'll be shipping to them.  And I had a slightly hollow feeling as i gazed over my craft table/area at the litter of paper scraps and die cuts organized in ziplock bags, Clear storage boxes of cardstock and fancy papers and decorator boxes full of inkpads, the cutting mats and tape guns, scissors, craft knives, paper punches, marker trays, folding bones and sheets of glue dots and foam adhesive squares, and binder books full of stamps.  I've so enjoyed not only the creative outlet making cards for OWH has provided, but also knowing I was doing really something special for our Troops overseas, in less than friendly countries and circumstances.  I just wish, as i have so many times before, that I'd found OWH earlier! 

So now I will spend a day reorganizing and turn my efforts to other organizations - having diligently searched SplitCoastStampers (where i found OWH in the first place) for ideas.  I've found 2 places that will take donated card - the Monthly Ronald McDonald House on rotation, and Cards for A Cause which rotates through charities each month.  My schedule makes my ability to contribute somewhat inconsistent, so i may change the way i do things - more cards at a time and bank some for next month's charity maybe.  And this will give me a chance to do other sizes of cards, as i don't believe either of them restrict size - which means i can play with concepts I normally only get to play with on my Christmas Cards I've been making for work. 

Below are the last of the cards to OWH - a total of 160 in this my last shipment - and this should give me a grand total of 775 cards to OWH - not bad for the 15 months I've been sending cards.  As always, they're on StampinUp cardstock base, with either StampinUp or Big Box background paper backgrounds and accents.  Die Cuts are on StampinUp, DCWV Shimmer , or Michaels Shimmer cardstock. Some DieCuts are done on my Bosskut Gazelle machine, and other on my Cuttlebug, and still others on my cute little Sidekick.  Stamps used are from all over, and it's impossible for me to track since they're all in books.  Ink is either StampinUp or Tsukineko Dew Drops.


I loved putting the vellum backed butterflies together for these cards! This is one of the newer papers from StampinUp I believe.

DieCut phonographs with Love You stamped on the banners coming out of the bell...very soft with Gold and Silver shimmer cardstock

I love you always - I love you forever.  Hopefully generic enough for man or woman. What more can be said? 

No sentiment -I had to make more of these - they're lovely!  DieCut on Bosskut Gazelle, with shiny background paper. 

The silver on Grey - with red and white is kinda stunning!

I had this stamp waiting for ... something. If I thought I could have I'd've made dozens of these - See You Soon!!! 

Window cards are still one of my favorites, and being home is somewhere I believe our troops want to be...  the outside says Miss You All The Time around the clock face on the left, and Home is Where the Heart is on the right...

And behind the panels on the front is home...in shimmery silver and gold cardstock from Michael's with brown vellum.  Again I let my Bosskut Gazelle do the cutting.  

Jul 1, 2015


The end is nearing - and i'm almost done with the box - a large Priority Shipping box.  They hold between 150-180 cards in my experience - and i'm just about at the 150 count now...and still have a little bit of room.  I went ahead and took pictures of the additions from last month's post - and there will be one last photo shoot before the box is sealed and shipped here in about 2 weeks.

As always, StampinUp card bases, and this time lots of StampinUp DSP for backgrounds, with a couple of BigBox papers and DieCutsWithView card stock pieces thrown in for accent.  Inks are either StampinUp or Tsukineko, and the stamps are from all over, but include StampinUp and Maya Road for sure. The generic mulberry flowers from a vendor overseas.

For the most part these cards are more classic and simple - with more cards that could be used for man or woman than usual.  I tried hard to make 'generic' cards.  With that thought, the last couple of cards have no sentiments at all, and I'm working on a few more the same way. I figure they stand on their own as a way to send a message home. 


Birthday for child or adult! 

Pretty sheer ribbon for Birthday
Birthday, highlighted by foil dots on the background paper
Thank You with one of the newer SU papers
Thank You with Mirror paper, and jewel sticker borders
Simple Thank You with DCWV shimmer cardstock
Thank You cards with cute bows
You're always in my heart, with a variety of papers.
Beautiful mirror papers, gold and silver mirror stock.
Love You, with ribbons, bows and mulberry flowers
Eye Chart - I LOVE YOU - Maya Road I believe, with Silver shimmer accents.
I do so love mulberry flowers - but do need to control myself! 
Miss you for man or woman. 
Yellows and purple - with silver shimmer paper accent.
Love the watercolor stamps by StampinUp
HandColored PeelOffs on Shimmer paper, Blue Shimmer accent, no sentiment. 
About the only card cut on my Gazelle - i think it speaks volumes without a single word on the card.